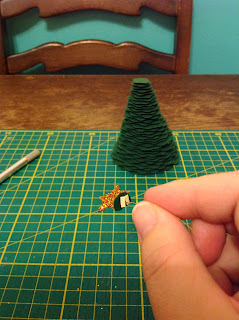
Lots of people on Facebook have asked me how I made this, so here's the tutorial.
You will need:
Green Card
A way of cutting wavy circles - a long way round I know (you may find an easier way) but I used the EK Circle Cutting Tool, the WRMK circle cutter and wavy scissors
Black Foam Pads (I used 2mm depth ones)
A star to go on the top (I used one from a confetti pack)
Glue
Embellishments to decorate your tree with (I used 2mm Gold Adhesive flat backed crystals)
Glitter
Step 1. Cutting your circles
I went the long way about doing this but it works for me. When I get a cutting machine again it will be much easier and quicker. I cut circles of card every 16th from 3" to 1" using the EK tool. From 1" to about 4/16th, I cut 4 circles using the WRMK tool. For those of you who aren't au fait with inches. it's every mark on the inch ruler
Cutting my circles...
This is what you end up with:
Then using my wavy scissors, I cut inside each circle, making sure the top of the wave cut just inside the edge of each circle.
They end up looking like this...
They're not design to be perfect. You will end up with points along the way, where you've start and stop cutting the waves with your scissors.
On the smaller circles they will look very odd and misshapen, but it doesn't matter, trees aren't perfectly symmetrical. I think it adds to the effect.
Step 2: Adding Pads and Layering
Start adding your pads. I used 5 on the larger circles, then went to 4,3,2,1 and pads cut in half for the very small ones. Do one at a time, then add your next layer...
When you add your next layer, make sure the waves show between the waves of the previous layer. This becomes more difficult as the layers get smaller and more misshapen. You also need to make sure you are placing your layers as centrally on the previous layer as possible.
Keep padding and layering....
and layering!...
STOP when you have 2 layers left to do. If you are adding a star you need to do this now. If you are doing a plain tree, you can continue adding the last 2 layers.
Step 3: Attaching your star.
Make a small hole in the middle of your star.
Thread your wire through the hole. bring it back together in one of the spaces between the star's points and twist together so you end up with one wired end...
Cover your star in glue on both sides and coat with glitter. This will hide the wire.
If you've used the same cutting tools as me your smaller layers will already have a small hole in the middle, left from the WRMK tool. If not you need to make a small hole with a pin or something similar in both of the top remaining layers. Select the smallest layer - the top one - and push your wire through top to bottom...
Add pads to the underneath of this layer. As its so small I ended up cutting a pad in half. Remove the backing paper from the pads ready to stick...
Select the 2nd layer - the only one left now - and poke your wire through this one top to bottom. Push these 2 layers together so the pads stick.
Add pads to the bottom of the second layer, ideally a half either side of the wire...
Wind your wire around the pads and neatly tuck the end in between the two to keep it out of site...
Remove the backing from the pads and add to the top of your tree...
Hope this all makes sense. If you need any more tips on this, notice I've missed anything or need more help, please get in touch.


