Morning!
Scarey!, less than a week to go until the website is finally launched! I can't describe how I feel right now, it's all a mixture of excitement, determination, relief, happiness, hopefulness.....the list goes on. This has been a very long time in the making.
No pics today, just wanted to get that off my chest!
See you soon
Saturday, 26 July 2014
Wednesday, 16 July 2014
Mens Wallet
Afternoon All,
Just a quick post as I wanted to share a new product on here which I thought might interest you. Its a man's wallet card. Complete with pockets and photo holder. The insert even has space for you to write on.
Saturday, 12 July 2014
Another Giveaway!
Sorry I haven't been on recently. I've been so busy with orders, preparing the website and organising the countdown...but it's all good! We're having another giveaway this weekend on Facebook, so join us to be in with a chance to win this...
Sunday, 6 July 2014
Thursday, 3 July 2014
Day 29 on the countdown
Join us on Facebook now for details on this pretty card for sale, http://www.facebook.com/pages/Katzart/289470233706
Wednesday, 2 July 2014
Tutorial - Paper Roses
Morning! Focused and ready to go today. Tutorial, finish an order, upload the first Facebook posting for the 30 Day Countdown, spend time with the kiddies and do bits around the house. Grand day ahead, I'm so excited about the 30 Day Countdown!!!
So first, a tutorial on how I made my paper roses from yesterday. I've never done a tutorial before so I hope this is ok. I decided not to do a video one as I always end up start/stopping the ones I watch to catch up on every step. I decided to do mine as a step by step with photo and instructions.
One thing to remember is that nature isn't perfect, so why should handmade flowers be either? If one petal is slightly wonky, it really doesn't matter, I think they look great anyway.
So here we go...
1. Cut 4 circles from your chosen paper. Remember whatever size you do them, the rose will end up slightly smaller all around because of the curling. I've done mine at 2" diameter.
2. Take one of the circles, fold it in half.
3.Fold this into thirds - remember it doesn't have to be perfectly perfect!
4.For the sake of this tutorial I have drawn the petal line, but I would normally do this freehand. Cut this out.
5. Cut the point off.
6. Open it up and it should look like this...
Do this to all 4 circles.
7. Curl your petals - I used a cocktail stick.
9. On one circle, cut one petal out.
10. On the second circle cut a section of two petals out. On the third, three petals out.
11. You should then have a full flower, a 5 petal piece, a four petal piece, 2x three petal pieces, a two petal piece and a one petal piece.
12. You only need one of the three petal pieces, so the one you are discarding, cut one petal to use as your base and throw away the rest.
13. You now need to glue and seal your 5, 4, 3, 2 and 1 petal pieces...
14. Put your glue gun on to warm up NOW :-)
15. Put some glue on your base petal and fix your full flower to it.
16. Now add some glue from your glue gun and place your 5 petal piece on top. Remember your petals should ideally be between the layer below, not in line. You'll have to be quick getting the placement right with glue gun glue as it goes off so quickly.
17. Using your glue gun, continue adding your layers, the next one is the 4 piece, then 3 piece, 2,1...
18. When you've put all your layers in, remove any strings of glue that are showing. Play around with the curls if you're not happy.
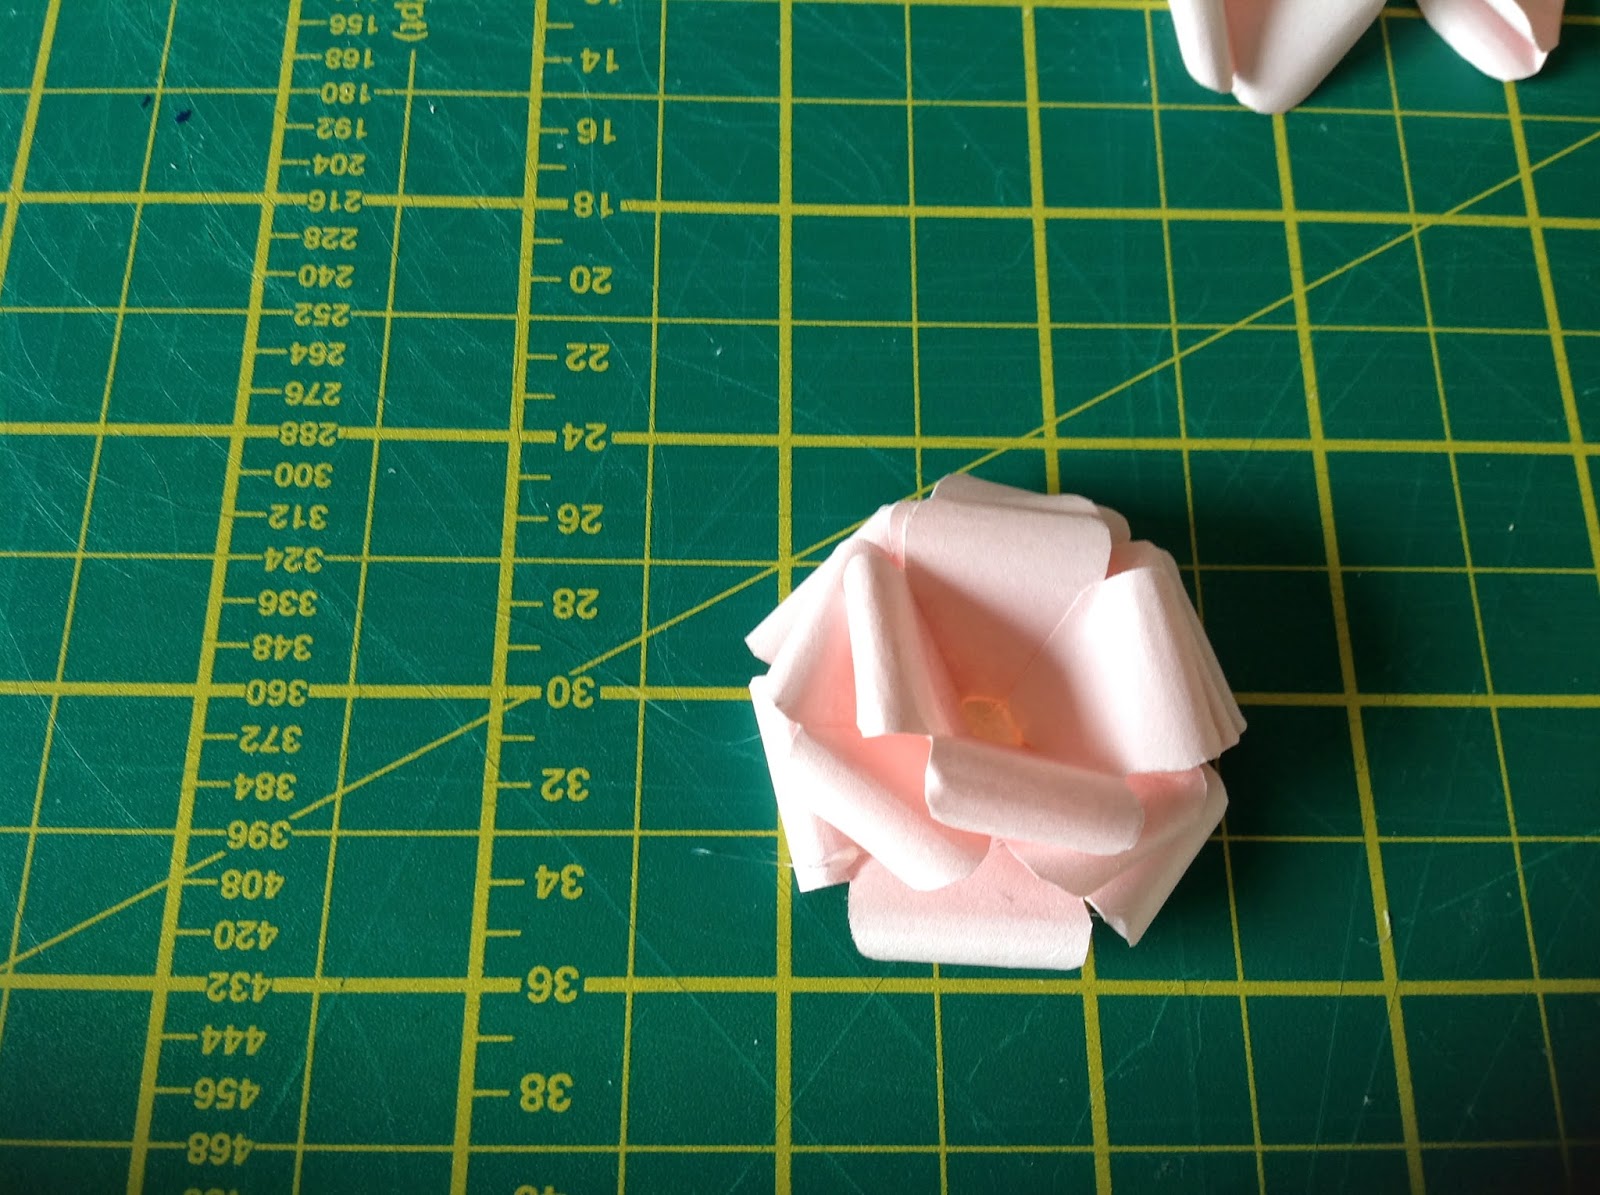
Your finished Product...
So first, a tutorial on how I made my paper roses from yesterday. I've never done a tutorial before so I hope this is ok. I decided not to do a video one as I always end up start/stopping the ones I watch to catch up on every step. I decided to do mine as a step by step with photo and instructions.
One thing to remember is that nature isn't perfect, so why should handmade flowers be either? If one petal is slightly wonky, it really doesn't matter, I think they look great anyway.
So here we go...
1. Cut 4 circles from your chosen paper. Remember whatever size you do them, the rose will end up slightly smaller all around because of the curling. I've done mine at 2" diameter.
2. Take one of the circles, fold it in half.
3.Fold this into thirds - remember it doesn't have to be perfectly perfect!
4.For the sake of this tutorial I have drawn the petal line, but I would normally do this freehand. Cut this out.
5. Cut the point off.
6. Open it up and it should look like this...
Do this to all 4 circles.
7. Curl your petals - I used a cocktail stick.
9. On one circle, cut one petal out.
10. On the second circle cut a section of two petals out. On the third, three petals out.
11. You should then have a full flower, a 5 petal piece, a four petal piece, 2x three petal pieces, a two petal piece and a one petal piece.
12. You only need one of the three petal pieces, so the one you are discarding, cut one petal to use as your base and throw away the rest.
13. You now need to glue and seal your 5, 4, 3, 2 and 1 petal pieces...
14. Put your glue gun on to warm up NOW :-)
15. Put some glue on your base petal and fix your full flower to it.
16. Now add some glue from your glue gun and place your 5 petal piece on top. Remember your petals should ideally be between the layer below, not in line. You'll have to be quick getting the placement right with glue gun glue as it goes off so quickly.
17. Using your glue gun, continue adding your layers, the next one is the 4 piece, then 3 piece, 2,1...
18. When you've put all your layers in, remove any strings of glue that are showing. Play around with the curls if you're not happy.
Your finished Product...
Hopefully that was ok as a tutorial, I would really welcome your feedback. If you have any questions or queries, please get in touch, I'm happy to help.
Tuesday, 1 July 2014
Paper roses
Today I am not so much crafting as house tidying ready for long awaited guests staying at the weekend, focusing my mind on the 30 day countdown starting tomorrow and playing with paper while the kiddies are asleep.
Yesterday, I delivered my card box to the post office, first time my cards have ever been in a shop. It was really lovely to see the box on the counter, I felt such a sense of achievement.
This morning, I decided I spend an absolute fortune on embellishments for my papercrafts and need to come up with ways of cutting my costs a bit. I'd also like to be able to make and sell my own embellishments. So I sat down with some paper and glue this morning. After watching numerous flower videos on youtube, I came up with my own way of doing them.
What do you think?
I've had some much positive feedback on these on facebook and many people have asked me to a tutorial on how I made them, so I guess I'll be getting on with that later :-)
That's all for now folks.
Yesterday, I delivered my card box to the post office, first time my cards have ever been in a shop. It was really lovely to see the box on the counter, I felt such a sense of achievement.
This morning, I decided I spend an absolute fortune on embellishments for my papercrafts and need to come up with ways of cutting my costs a bit. I'd also like to be able to make and sell my own embellishments. So I sat down with some paper and glue this morning. After watching numerous flower videos on youtube, I came up with my own way of doing them.
What do you think?
I've had some much positive feedback on these on facebook and many people have asked me to a tutorial on how I made them, so I guess I'll be getting on with that later :-)
That's all for now folks.
Saturday, 28 June 2014
Block Card
Morning,
I've seen this template used a lot recently where you have what looks like blocks forming a fold up card. My dilemma was that it only ever showed it as 3 blocks high and I wondered if it could be adapted to be any size. So yesterday I sat down with my drawing pad and worked it out. I wanted to do something different for Brother-in-Laws Birthday card: 30 this year, business trainer by day, DJ by night and a thrill seeker at other times!
This is what I came up with...
Front
Back
I've seen this template used a lot recently where you have what looks like blocks forming a fold up card. My dilemma was that it only ever showed it as 3 blocks high and I wondered if it could be adapted to be any size. So yesterday I sat down with my drawing pad and worked it out. I wanted to do something different for Brother-in-Laws Birthday card: 30 this year, business trainer by day, DJ by night and a thrill seeker at other times!
This is what I came up with...
Back
That's all for now
Friday, 27 June 2014
A Mad and Exciting Day
Morning All,
Yes it's early...thank you Elliot for waking me at 5am this morning. We are now camped out downstairs waiting for Daddy and Sophie to wake and a normal Friday to kick in.
Although after yesterday I am now beginning to see what a normal day will be like....and it's quite exciting. After the positive sale table at Little Mouslings on Wednesday and all the feedback and suggestions that came with it, I sat down to dabble with a Thank You Teacher Box Card. This is what I came up with.
I was so pleased with it, I posted it on Facebook...I've already received some requests and hopefully more to come as again there has been some very positive feedback on this, especially as it can be personalised to include teachers names and messages on the stars.
So yesterday, while Sophie played out in the sunshine and Elliot played inside on his mat, between naps, lunch, phone calls and coffee, I had a very productive day making and taking orders and watching my online presence grow. It was great. Here's to more of that.
Yes it's early...thank you Elliot for waking me at 5am this morning. We are now camped out downstairs waiting for Daddy and Sophie to wake and a normal Friday to kick in.
Although after yesterday I am now beginning to see what a normal day will be like....and it's quite exciting. After the positive sale table at Little Mouslings on Wednesday and all the feedback and suggestions that came with it, I sat down to dabble with a Thank You Teacher Box Card. This is what I came up with.
I was so pleased with it, I posted it on Facebook...I've already received some requests and hopefully more to come as again there has been some very positive feedback on this, especially as it can be personalised to include teachers names and messages on the stars.
So yesterday, while Sophie played out in the sunshine and Elliot played inside on his mat, between naps, lunch, phone calls and coffee, I had a very productive day making and taking orders and watching my online presence grow. It was great. Here's to more of that.
Friday, 20 June 2014
My Cards in a Shop!?! Yes Please :-)
Evening All,
So after struggling with Pollen for most of the week, I finally managed to get myself together and organised for my meeting today with my lovely shop manager lady who took an interest in my cards....and she said YES.
I took a pack of samples for her to show her Area Manager, some text about me and my crafting and a suggested pricing structure. She was so impressed she said yes there and then. It included this morning's make, an Easel Card with one of my recent purchases Santoro's Gorjuss stamp (I love this girl) ...
The shop assistant who was there today loved them too and ordered one for her friends Birthday next week.
So, from next month, there will be a box of mixed cards of mine in our local post office, to be topped up weekly or as required. Furthermore, there are two other post offices who I have been given the details of to approach to do the same thing, but I'm going to see how this one goes for the first month.
All I can say is I'm very happy :-)
So after struggling with Pollen for most of the week, I finally managed to get myself together and organised for my meeting today with my lovely shop manager lady who took an interest in my cards....and she said YES.
I took a pack of samples for her to show her Area Manager, some text about me and my crafting and a suggested pricing structure. She was so impressed she said yes there and then. It included this morning's make, an Easel Card with one of my recent purchases Santoro's Gorjuss stamp (I love this girl) ...
The shop assistant who was there today loved them too and ordered one for her friends Birthday next week.
So, from next month, there will be a box of mixed cards of mine in our local post office, to be topped up weekly or as required. Furthermore, there are two other post offices who I have been given the details of to approach to do the same thing, but I'm going to see how this one goes for the first month.
All I can say is I'm very happy :-)
Saturday, 14 June 2014
New Stock and new Possibilities
Morning All,
A lovely sunny day here now the storms of last night have passed. All the windows and doors open, washing on the line, just taking a break before I do stage 2 of the housework downstairs.
I've been so busy recently doing lots of wedding things for an order and making new stock to sell at a fair taking place today...but I'm not there I hear you shout?! No, I pulled out at the last minute. Elliot would have had to come with me because of feeding and it was at an outdoor event very close to a music stage. I wasn't going to risk him being upset by the noise or damage his hearing.
So although I'm not selling anything today, I have made some things I'm really pleased with to go on the website (counting down now!) and it's definitely got my crafting mojo back and kicked me into gear to get on with things.
I also spoke to the very nice manager lady at our local sub post office this morning - she liked my father's day box card so much, I'm meeting her on Friday to discuss selling some cards there : -)
A lovely sunny day here now the storms of last night have passed. All the windows and doors open, washing on the line, just taking a break before I do stage 2 of the housework downstairs.
I've been so busy recently doing lots of wedding things for an order and making new stock to sell at a fair taking place today...but I'm not there I hear you shout?! No, I pulled out at the last minute. Elliot would have had to come with me because of feeding and it was at an outdoor event very close to a music stage. I wasn't going to risk him being upset by the noise or damage his hearing.
So although I'm not selling anything today, I have made some things I'm really pleased with to go on the website (counting down now!) and it's definitely got my crafting mojo back and kicked me into gear to get on with things.
I also spoke to the very nice manager lady at our local sub post office this morning - she liked my father's day box card so much, I'm meeting her on Friday to discuss selling some cards there : -)
That's all for now.
Subscribe to:
Posts (Atom)